23.4.09

ODI Public Web Services on WebLogic 10.3


For some reason trying to run ODI (Oracle Data Integrator) public web services on axis2 (1.2.1) container on top of WebLogic 10.3 seemed problematic. Axis2 WAR deployment was successful, but for some reason Axis2 refuses to upload/install the ODI web services AAR file. Nothing in the logs.

After cratching the head a while I figured out the way to get ODI public services installed on WebLogic 10.3. Here are the steps:

Step 1 (please adjust according to your env)

Copy €ODI_HOME/oracledi\tools\web_services\odi-public-ws.aar –file to the Web Logic Axis2 deployment directory:

C:\product\OSB103\osb_10.3\samples\domains\servicebus\servers\xbusServer\tmp\_WL_user\axis2\1sft87\war\WEB-INF\services>

Step 2: Edit services.list

Edit services.list, add:
odi-public-ws.aar

Step 3: Bounce the axis2 application

Stop the axis2 application and start. Now you should have the ODI public web services API available as Axis2 service.

26.3.09

Adding ODI Public Services to JDeveloper Service Explorer

Oracle Data Integrator 10.1.3.5 has now a simple (static) WSIL definition file that can be utilized in SOA development. How this should show up in practical SOA development, you should see the ODI public web service as a service in the "Service Explorer" window in JDeveloper.

This is what I want:

image

In order to get this working requires couple of manual/trivial configuration steps. First of all I assume that you have deployed the axis2 container to e.g. OracleAS or some other servlet/Java EE container. In my installation I've created a dedicated "odi" OC4J instance for ODI services. Axis2 shows up in my installation using http://localhost:8889/axis2.

Also assumed is that you use ODI 10.1.3.5 that has the required WSIL file. You could use also earlier versions of ODI, just by creating the WSIL file shown in this article.

Step 1: Copy OdiInvoke.wsil file from ODI to axis2 directory

The wanted file is located in $ODIHOME/oracledi/lib/OdiInvoke.wsil. You should copy this file to axis2 web application directory.

In my installation I copied it under this kind of directory:

D:\product\10.1.3.1\soasuite\j2ee\odi\applications\axis2\axis2-1_2\axis2-web

In your installation you might use SOA suite's OC4J for deployment, in which case you should change the "j2ee\odi" part to "j2ee\home" or "j2ee\oc4j_soa".

Step 2: Fix the OdiInvoke.wsil

There is a small issue in the WSDL location that prevents the WSDL path working correctly under OC4J/axis2.

Edit OdiInvoke.wsil, change the WSDL location to match your axis2 deployment context.

<?xml version="1.0" encoding="UTF-8"?>
<inspection xmlns="http://schemas.xmlsoap.org/ws/2001/10/inspection/"
    xmlns:wsilwsdl="http://schemas.xmlsoap.org/ws/2001/10/inspection/wsdl/"
    xmlns:wsiluddi="http://schemas.xmlsoap.org/ws/2001/10/inspection/uddi/"
    xmlns:uddi="urn:uddi-org:api">
    <service>
        <abstract xml:lang="en-US">
            Oracle Data Integrator Public Web Services
        </abstract>
        <description referencedNamespace="http://schemas.xmlsoap.org/wsdl/"
            location="./services/OdiInvoke?wsdl">
            <wsilwsdl:reference endpointPresent="true">
                <wsilwsdl:referencedService xmlns:impl="xmlns.oracle.com/odi/OdiInvoke/">
                    impl:OdiInvoke</wsilwsdl:referencedService>
            </wsilwsdl:reference>
        </description>
    </service>
</inspection>

to

<?xml version="1.0" encoding="UTF-8"?>
<inspection xmlns="http://schemas.xmlsoap.org/ws/2001/10/inspection/"
    xmlns:wsilwsdl="http://schemas.xmlsoap.org/ws/2001/10/inspection/wsdl/"
    xmlns:wsiluddi="http://schemas.xmlsoap.org/ws/2001/10/inspection/uddi/"
    xmlns:uddi="urn:uddi-org:api">
    <service>
        <abstract xml:lang="en-US">
            Oracle Data Integrator Public Web Services
        </abstract>
        <description referencedNamespace="http://schemas.xmlsoap.org/wsdl/"
            location="/axis2/services/OdiInvoke?wsdl">
            <wsilwsdl:reference endpointPresent="true">
                <wsilwsdl:referencedService xmlns:impl="xmlns.oracle.com/odi/OdiInvoke/">
                    impl:OdiInvoke</wsilwsdl:referencedService>
            </wsilwsdl:reference>
        </description>
    </service>
</inspection>

Step 3: Configure JDeveloper 10.1.3.4 to show local WSIL registry

Edit

$JDEVHOME\integration\bpm\designer\config\serviceexplorer_plugin.xml

Uncomment:

<!-- Commenting WSIL as xmethods wsil is no more valid (accessible)
    <ExternalSource name="WSIL" class="oracle.tip.tools.ide.pm.datasources.wsil.WSILDataSourceContainer" enable="true">
    </ExternalSource>
-->


Step 4: Create inspection.wsil file for JDeveloper local WSIL registry

JDeveloper 10.1.3.4 no longer has inspection.wsil file shipped with it. You must create it manually to the same directory where serviceexplorer_plugin.xml is located.

Create file

$JDEVHOME\integration\bpm\designer\config\inspection.wsil

Contents of the file (please change the OdiInvoke.wsil URL to match your environment):

<?xml version="1.0"?>
<inspection xmlns="http://schemas.xmlsoap.org/ws/2001/10/inspection/"
            xmlns:wsilwsdl="http://schemas.xmlsoap.org/ws/2001/10/inspection/wsdl/">

<link referencedNamespace="http://schemas.xmlsoap.org/ws/2001/10/inspection/"
            location="http://localhost:8889/axis2/axis2-web/OdiInvoke.wsil">
        <abstract>Oracle Data Integrator Public Web Service</abstract>
</link>
</inspection>

Step 5: Restart JDeveloper 10.1.3.x and test

Now you should have everything ready for testing. Service Explorer should have a new folder called "Local Registry" and one subfolder called "Oracle Data Integrator Public Web Service" underneath it. The name of the folder can be changed just by editing the inspection.wsil file (created in step 4).

Now to use it, you could create a SOAP service in OESB or partner link in BPEL. Recommended way is to create a routing service to virtualize the ODI public web service details. My recommendation would be to create a well defined public routing WSDL with strongly typed payload, instead of generic ODI web service API.

Have fun!

28.1.09

Enabling Subversion on Oracle BPM Studio 10.3

Are you using Subversion and wanted to import your BPM Studio 10.3 project to Subversion repository for sharing amongst your project team?

Here are quick and dirty steps to setup subversion (SVN abbreviated) connection and importing the BPM Studio project into the version control.

Sharing BPM project

image

Click the context menu (mouse right click) on the main level of your BPM project.


image

Choose "Share Project..."


image

Choose SVN as versioning repository type.


image 

Enter the URL for the repository. In this example I used Windows based VisualSVN server with https protocol. You might want to point this to your repository URL or subfolder under it. Please note that you will have the possibility to define the BPM project folder later on (e.g. if you wanted to use the "trunk" -practice with subversion).

Depending on the security settings you might need to enter username / password for the repository.


image

Either let the wizard automatically use the BPM project name as folder name or define your own folder name (e.g. when using trunk's). In my sample I let the wizard derive the folder name from the BPM project name.


image

Ready to rock. Enter the comment for the folder name. Please note that at this point the wizard will not commit the resources to the repository. You will need to commit the files later. Press Finish.


image

Sharing the project...


image

The synchronization perspective view will show all the source code for the project. If you wanted to commit all the changes you can do it in the next step, after pressing "Yes".


image

If you pressed "Yes" you will get this perspective. You could commit the changes (your BPM project source code) from this Eclipse perspective, but in my tutorial I switch to BPM perspective and commit the changes directly there.

Switching to BPM Perspective


image

Look at Eclipse top right corner. To switch back to BPM Perspective, press the perspective Icon and choose Other...


image

Choose BPM (default) and you will get the BPM design view back.


image

From the log window you can see that only the project folder was created in the first phase.


Committing Changes


image

Now when you really want to commit all the BPM project source files to version control, you should choose the project context menu Team -> Commit...


image

Commit wizard will show you all the files that are changed since the original check out. Since this was the very first import, you will see all the BPM project files marked as changed. Enter a propert explanation for the project and just press Ok to commit the changes.


image

Status window to show the files being committed.


image

After the commit, you will see all the files committed in the log window.


image

(Optional) Looking at SVN repository you wout see the BPM project source files (this application is only available if you have access to server having the subversion repository).


image

If you made any change in the BPM project and chose Team -> Commit... the wizard will show all the files affected by your change. You should give a description of your change and press Ok to submit the changes to version control.


That's it, very basic introduction to subversion and Oracle BPM Studio 10.3.

20.1.09

Enforcing WebLogic 10.3 Admin Console to use Finnish HST Card Authentication

By default WebLogic admin console is deployed on the same port as other applications, non-encrypted HTTP traffic, and using username and password as authentication.

To give the highest level of security on the admin console here are some steps to take:

  1. Change the admin console from the standard port to SSL secured admin port
  2. Enable Two-Way Authentication so that only clients with valid digital certificate can access the admin console

In Finland, one of the easy ways to get official  client certificate is to use your HST smart card for authentication. To use that in your workstation, you need smart card reader and software for that. Software can be downloaded free from http://www.fineid.fi/ (Follow the link "Lataa kortinlukijaohjelmisto").

In this article I've tried to summarize steps to enable WebLogic 10.3 server two-way SSL setup with HST client certificate.

To summarize the steps:

  1. Create self signed server certificate and store if into custom keystore file
  2. Extract VRK's trusted CA certificates and import them to the custom keystore file
  3. Setup custom keystores (for server identity and trust keystore) in WebLogic server
  4. Create user that corresponds the HST card username. Assign Administrative group to the user.
  5. Change management port
  6. Change admin console authentication method from FORM to CLIENT-CERT
  7. Test

Please note that at some point you will get a browser error stating that the server certificate is not valid. This is because of using self-signed server certificates. If you used "official" server certificates e.g. from Verisign you wouldn't get these errors. When using self signed certificates, you just need to accept the error and import the certificate on browser keystore. This error would only happen the first time(s) accessing the site protected with https (SSL).

Warning: These instructions are experimental and you should make full backup of your environment before trying anything in here. DO NOT TRY THIS IN PRODUCTION BEFORE MAKING SURE IT WORKS IN DEVELOPMENT AND TESTING FIRST.


Extracting the Trusted CA Certificates from HST Card

You will need the trusted CA (certificate authority) public certificates later in WebLogic key storage to verify the client HST card certificates. If you don't have those trusted VRK (Väestörekisterikeskus) certificates yet, here is one way to get them:

1. Open up the smart card application (here mPollux as an example):
image

Navigate to "Luotetut varmenteet" and first choose "VRK Gov. Root CA":

image

Double click on the certificate and you will get this window:

image

Press Details -tab.

image

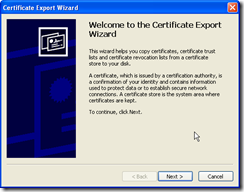
Press "Copy to file..."

image

Press next.

image

Choose Base-64 encoded X.509 (.CER)

Press Next.

image

Enter the name of the certificate file and press Next.

image

Press Finish.

image

After successful export, you should have an OK window.


Repeat the same for the "VRK Gov. CA for Citizen Qualified Certificates".


After these two steps, you should have files with names e.g. vrk_root.cer and vrk_citizen.cer in your chosen folder. These are base64 encoded text files.


Creating a Self Signed Custom Keystore for Two-way SSL

Now we create a custom keystore to store the identity of the WebLogic server certificate and also to include the VRK public certificates so that WebLogic can verify the HST card client certificate against them.

Here is an example (server certificate for 10 years = 3600 days):

keytool -genkey -dname "cn=localhost, ou=Oracle Finland, o=Oracle, c=FI" -alias localhost -keypass mypassword
    
-keystore D:\product\JDEV11\wlserver_10.3\server\lib\harri.jks -storepass mypassword -validity 3600

Above command (by the way, keytool is found from the Java binaries) creates a keystore file named "harri.jks". You can list the contents of the file with following command:

keytool -list -storepass mypassword -keystore harri.jks


Now, import the VRK trusted certificates next:

keytool -import -file D:\temp\vrk_root.cer -trustcacerts -alias VRK_ROOT -keystore harri.jks
keytool -import -file D:\temp\vrk_citizen.cer -trustcacerts -alias VRK_CITIZEN -keystore harri.jks

Now you should have the keystore ready for two-way authentication. Next step is to configure WebLogic server to use this keystore.


Setting up the custom keystores in WebLogic

Navigate to admin console: Home >Summary of Servers >DefaultServer

Choose Configuration tab and Keystores tab.

image

Choose "Custom Identity and Custom Trust" from the "Keystores" popup list.

Specify the exact path to the keystore you just created above, keystore type "jks" and enter the password for the keystore.

Press Save.

Press "SSL" tab.

image

Choose "Private Key Alias" as the same you used in earlier chapter "Creating a Self Signed Custom Keystore for Two-way SSL".

For example if you used:

keytool -genkey -dname "cn=localhost, ou=Oracle Finland, o=Oracle, c=FI" -alias localhost -keypass mypassword -keystore D:\product\JDEV11\wlserver_10.3\server\lib\harri.jks -storepass mypassword -validity 3600'

you should enter "localhost" as the alias here to mark the unique key to the server certificate.


Press the "Advanced" link.

image

Change "Two Way Client Cert Behaviour" to wanted value, like "Client Certs Requested But Not Enforced" or "Client Certs Requested And Enforced".

Press Save and reboot the WebLogic server.


What Is My HST Card Username?

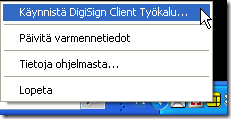
To see your username in the Finnish Government ID card, you can do it e.g. by looking at the smart card reader application. In my example I am using mPollux software and I can launch the software by choosing the context menu from mPollux tray icon (yellow icon below):

image

image

Choose the first option to start the application.

From the "Lukijat ja kortit" -tab choose the card reader -> Käyttäjän varmenteet -> todentamis- ja salausvarmenne. Double-click on that item.

image 

You will see following window, where the "Issued to:" field will show the username you should write down for later use.

image

Create User and Assign Admin Privileges

Navigate to Security Realms page on admin console.

image

Press "myrealm" (or whatever you have in your server) link.

image

Press "New" to enter new user.

image

Enter the username that is stored in your HST card on "Name" field. You can set whatever password you like, but this is not used when enforcing client certificates. If you don't know the value to put on "Name" -field, please follow the chapter "What Is My HST Card Username?".

Assign the needed Groups to the user:

image

You would need at least "Administrators" group to enter the admin console application.


Change management port

To ensure security, you should change the admin console to use administration port (9002 or whichever you choose). This is done from Home -> DefaultDomain -> Configuration -> General.

image

After the port change, the URL is moved to this admin port right away.

Change Console Authentication Method

By default WebLogic admin console uses form based authentication (username / password). To enforce using client certification from the Finnish HST card you need to change console application slightly.

In this example I use JDeveloper 11.1 and the WebLogic that is shipped with it. On this installation, console application is found under:

D:\product\JDEV11\wlserver_10.3\server\lib\consoleapp

web.xml file is here

D:\product\JDEV11\wlserver_10.3\server\lib\consoleapp\webapp\WEB-INF\web.xml


Edit web.xml as follows. Comment out the FORM based authentication method and replace it with CLIENT-CERT method, like this:

  <login-config>
<!-- Commented out
    <auth-method>FORM</auth-method>
    <form-login-config>
      <form-login-page>/login/LoginForm.jsp</form-login-page>
      <form-error-page>/login/LoginError.jsp</form-error-page>
    </form-login-config>
-->
        <auth-method>CLIENT-CERT</auth-method>
  </login-config>

You could also change the auth-method to value “CLIENT-CERT,FORM” to fall back to username / password authentication if client certificate authentication fails.

After the changes, restart WebLogic server.


FireFox / Mozilla Setup

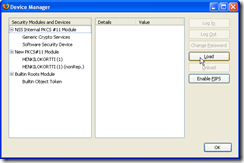
If you used mPollux and FireFox or Mozilla, you need to setup the security device manually (this is done only once). You do this by choosing the Tools -> Options -> Advanced and pressing "Security Devices".

image

Press "Load" to choose to load a new security device.
image

Give it a name and choose file. With mPollux it looks something like:

image

If you needed to do this setup, just to make sure, exit the browser and startup again.

Test Run

Close all browser windows and remove the Finnish HST card from the card reader.

Enter the HST card into the smart card reader.

Open up a browser (IE, Mozilla, FireFox ...) and enter the console URL:

https://localhost:9002/console


You should now get the smart card PIN window. An example when using Fujitsu DigiSign software, is below:

image

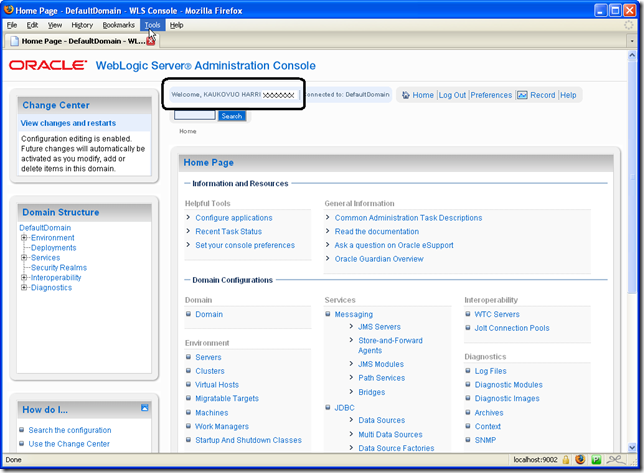
When entering the PIN code, you are allowed to enter the console, if your username is assigned to Admin group:
image

15.1.09

New Extensions Available from JDeveloper Official Update Center

During the years I've developed few JDeveloper extensions for ESB, BAM, Python (migration from 10.1.2) and JDev Projects. These extensions are now available from the official third party extensions exchange listed here:

http://www.oracle.com/technology/products/jdev/101/update/exchange.xml

To install the extensions, you just need to choose Help -> Check for updates and all the available extensions are listed for installation.

2.12.08

Local IMAP4 server on Windows (cygwin)

When moving from Thunderbird to e.g. MS Outlook 2007 there are issues how to migrate the emails from one format to another. There are two main option:

1. Use 3rd party tool to migrate the Thunderbird folders to PST format or another format that Outlook supports. There are some free utilities that convert the files to EML format.

2. Setup a local IMAP4 server that acts only locally to serve your folders/emails. When IMAP server is in your local workstation then use that as your "local Mail Account" to extend your email capabilities from the central server.


Looked at the option 1) and quickly realized that I could spend ages converting my emails more or less manually to Outlook format. Forgot that.

Moved to option 2) which is actually a very nice approach to virtualize my emails as a generic service that could be used anywhere, not just my email client (being that Thunderbird or Outlook).


How to do this was another issue. There were bits and pieces on the Internet but none of the documents explained exactly what I should do. Finally, after getting this working I decided to document these steps, at least to serve my own memory in the future.

Here are the steps for Windows users to setup open source IMAP4/POP3 server on your workstation. Hopefully I didn't forget anything.


A word of warning. IMAP4/POP3 server shipped with Cygwin (uw-imap/uw-ipop3) should not be used in production use. It seems to work but has some limitations, like not handling subfolders elegantly and some other rarerities. So, take it as it is, and adopt your way of working.

Yes, I know there are other alternatives but this is not a subject of this post.


1. Install cygwin, inettools and OpenSSL (as cygwin packages)

If cygwin isn't familiar, go to http://www.cygwin.com/.


2. After installing cygwin + tools open up the bash command line

Navigate to the directory you installed cygwin to and enter cygwin.bat. This should bring you Unix like shell and when you enter commands described below, you should be fine.


3. Make sure you have following lines in your /etc/inetd.conf

In other words, edit the file mentioned above.

pop3  stream  tcp  nowait  root   /usr/sbin/uw-ipop3d
imap  stream  tcp  nowait  root   /usr/sbin/uw-imapd
pop3s  stream  tcp  nowait  root   /usr/sbin/uw-ipop3d
imaps  stream  tcp  nowait  root   /usr/sbin/uw-imapd


4. Add following lines to /etc/services

imaps             993/tcp
pop3s             995/tcp

5. Create server certificates for the IMAP/POP3 SSL connection

UW-IMAP uses SSL certificates from Cygwin:s /usr/ssl/certs directory (or whichever directory is defined in /usr/ssl/openssl.cnf as “dir” variable) . Below are sample command to creat self-signed certificates for your own purpose or development/testing:

cd /usr/ssl/certs

openssl req -new -x509 -nodes -out uw-imapd.pem -keyout uw-imapd.pem -days 3650

openssl req -new -x509 -nodes -out uw-ipop3d.pem -keyout uw-ipop3d.pem -days 3650

Please note that you MUST use exactly those file names to get things working correctly.


NOTE: Please remember to enter your workstation name or "localhost" in the question for "Common name (eg. YOUR name) []:". If you entered your own name you will have following error message every time you login to see your emails in IMAP server:

 image

6. Install inetd daemon as Windows service

/usr/sbin/inetd    --install-as-service

If above approach doesn’t work properly, try out following:

cygrunsrv -I inetd -d "CYGWIN inetd" -p /usr/sbin/inetd -a -d -e CYGWIN="tty ntsec"

7. Refresh Windows users to the local passwd and group files

mkpasswd  --local   >   /etc/passwd
mkgroup  --local   >   /etc/group

After this when you connect to IMAP server you can use your Windows account username and password to login.


8. If using exim and imap together, tie these directories together with symbolic links

cd /var/spool
ln -s /var/spool/mail /var/mail
chmod   1777   /var/mail


9. Start the IMAP server

net start inetd

Stopping is done like this: net stop inetd


10. Connecting to IMAP server using SSL connection

By default the binaries delivered with cygwin have IMAP server in the most standard mode, plaintext login disabled by default. This means you need to set up IMAPS connection to the IMAP server. The first time you connect, you will get following error message if using self-signed certificates:

 image

After you choose "Accept the certificate permanently" and press OK, you should have login screen to enter your username and password. Next time you login, this nag screen doesn't show up since you accepted your own signed certificate permanently.

On Outlook, you will get a warning stating that the self signed root certificate for (e.g. localhost) doesn't exist. You fix this by importing your self signed root certificate to Internet Explorer (Tools -> Internet Options -> Content -> Certificates -> Trusted Root Certification Authorities Tab -> Import). Before this you must convert your self signed certificate to the format that IE understands:

/usr/ssl/certs

openssl x509 -in uw-imapd.pem -inform PEM -outform DER -out uw-imapd.crt

You need to import this uw-imapd.crt file on IE.


11. All is fine and the world is a better place to live

Troubleshooting

IMAP doesn’t work after updating cygwin stack.

Symptom of this might be that you just get empty or no response from IMAP server. Inetd might be accepting the request but no folders or message content is shown. Make sure that SSL setup is done correctly. Sometimes cygwin update will overwrite the openssl.cnf file and change the certificates directory location. Double check the setup and directories.

3.11.08

Oracle Applications Adapter: IREP File not present

I have been playing with the Oracle Applications adapter. When connecting to EBS Rel12 the first time you might get following dialog prompting to download the irep file as local copy. When you press "Yes", adapter wizard will download the irep repository content to your local file.

image

Getting IREP File not present repeatedly

Once you have downloaded the repository you should be fine. But you might be getting this same dialog file coming to you, time after time. The issue is not that you haven't received the local repository. I noticed that the reason is because of your database connection name is in uppercase and the wizard is looking for file name in lowercase.

The workaround to get over this repeated error message is to rename the local irep file to all lowercase, like this:

image

An example:

ren irep_data_EBS12DEV_20081103_2143.dat irep_data_ebs12dev_20081103_2143.dat

image


After this, you should have another wizard page in the Oracle Applications Adapter wizard page:

image